Tips for the Back Office
Moving Between Daily Sheets
Easily move between a driver’s daily sheets using the Previous and Next sheet items or click on the Load Sheet item to use a calendar to select a date. The Today item will bring you back to today’s daily sheet for the driver. You can also click in the Date field on the daily sheet to select a specific date from the calendar. The Load NCR option allows you to locate a driver’s daily sheet by an NCR number. The Load Work Diary # option allows you to search for a driver by a Work Diary number.

Adding a Driver
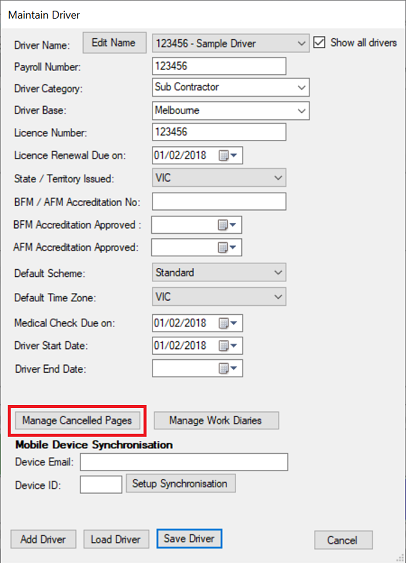
Click on the Maintain Driver menu item to add your driver’s identification details into Work Diary Mate.

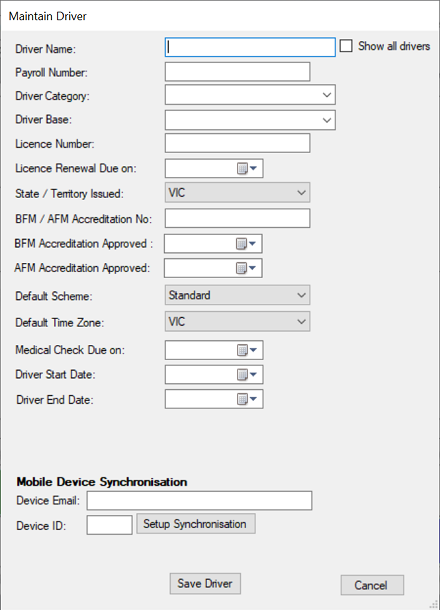
You can leave the Driver Category blank, select from the drop list or add a new Driver Category by simply typing in the field and clicking the Save Driver button. The new category will be added to the drop-down list.
Similarly you can leave the Driver Base blank or add a new Driver Base by simply typing in the field and clicking the Save Driver button. The new driver base will be added to the drop-down list. This field can be used to differentiate drivers from different locations and is helpful to reduce the length of your driver drop down list.
The Driver Start Date and Driver End Date fields relate to when drivers started and ended working for you. If the Driver End Date is entered and is in the past, this driver will not show in your driver drop down lists and will help reduce the length of your driver drop down lists.
The Show all drivers check box is used to give you a full list of all your drivers. This includes drivers from all your Driver Bases and drivers who have left your employment. (i.e you have entered a Driver End Date prior to today.)
Drivers using Work Diary Mate for Mobile, can synchronise their data automatically from their mobile devices directly into our Work Diary Mate for the Back Office software. Click here for more information on how to set this up.
Cloning a Driver
This feature allows you to clone a driver record so you can forward plan for a driver. This is useful if you have drivers that are being synchronised from their mobile devices, where you are unable to edit their work/rest hours.

Making a Driver Inactive
You cannot delete drivers from the Back Office but you can make them inactive. To do this go to the Maintain Driver option, select your driver and enter in an end date in their driver record. They will no longer appear in your drop down list of drivers.
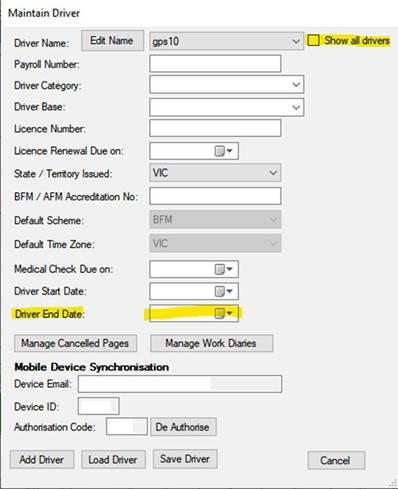
You only get charged for drivers that have been accessed or are active in a given month, so you can have unlimited drivers in the system and you will not be charged for inactive drivers unless they are accessed during the month. Should you need to access the inactive driver record, simply check the “Show All Drivers” checkbox and all inactive drivers will be included in the drop list of drivers.
Daily Sheet Explained
The daily sheet is an exact copy of the driver’s paper work diary which makes it easy to transfer across your driver’s activities. Areas of the daily sheet where you can enter in information are indicated with a red border in the example below.
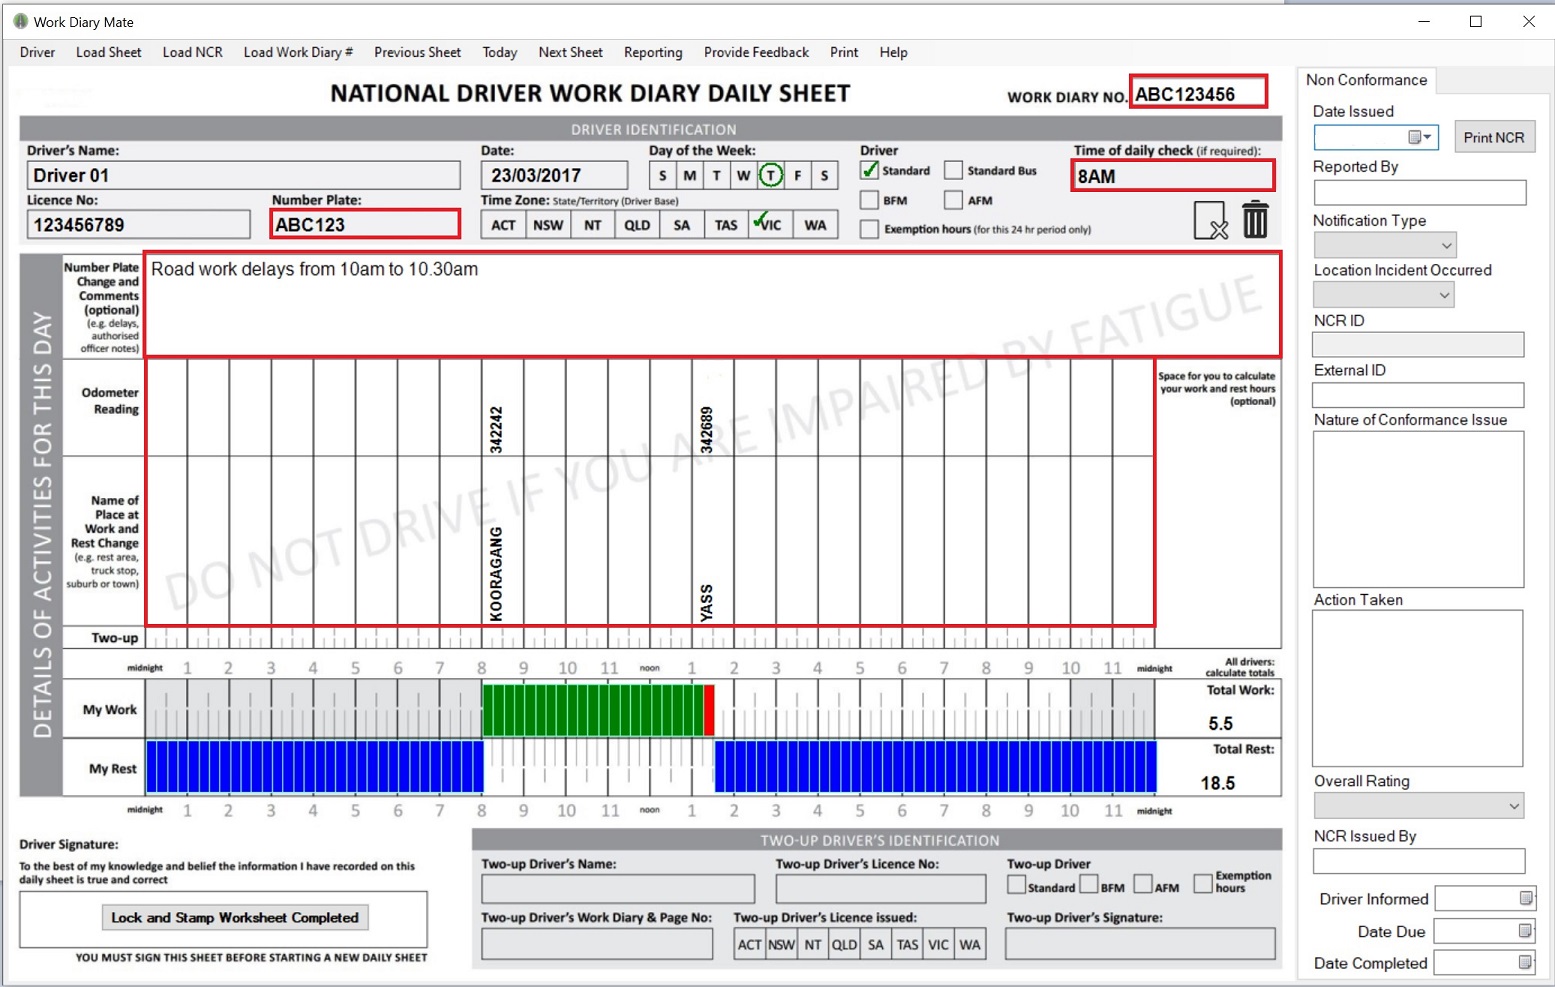
You can print a copy of a daily sheet by simply clicking the Print menu item.

Checking for Breaches
Click and drag in the My Work section to enter your driver’s work hours. Work hours are displayed in green and Rest hours in blue. Work Diary Mate will identify any breaches of the work and rest hour options in Red. Place your cursor over the area to show a detailed description of the breach.

Entering in Two Up
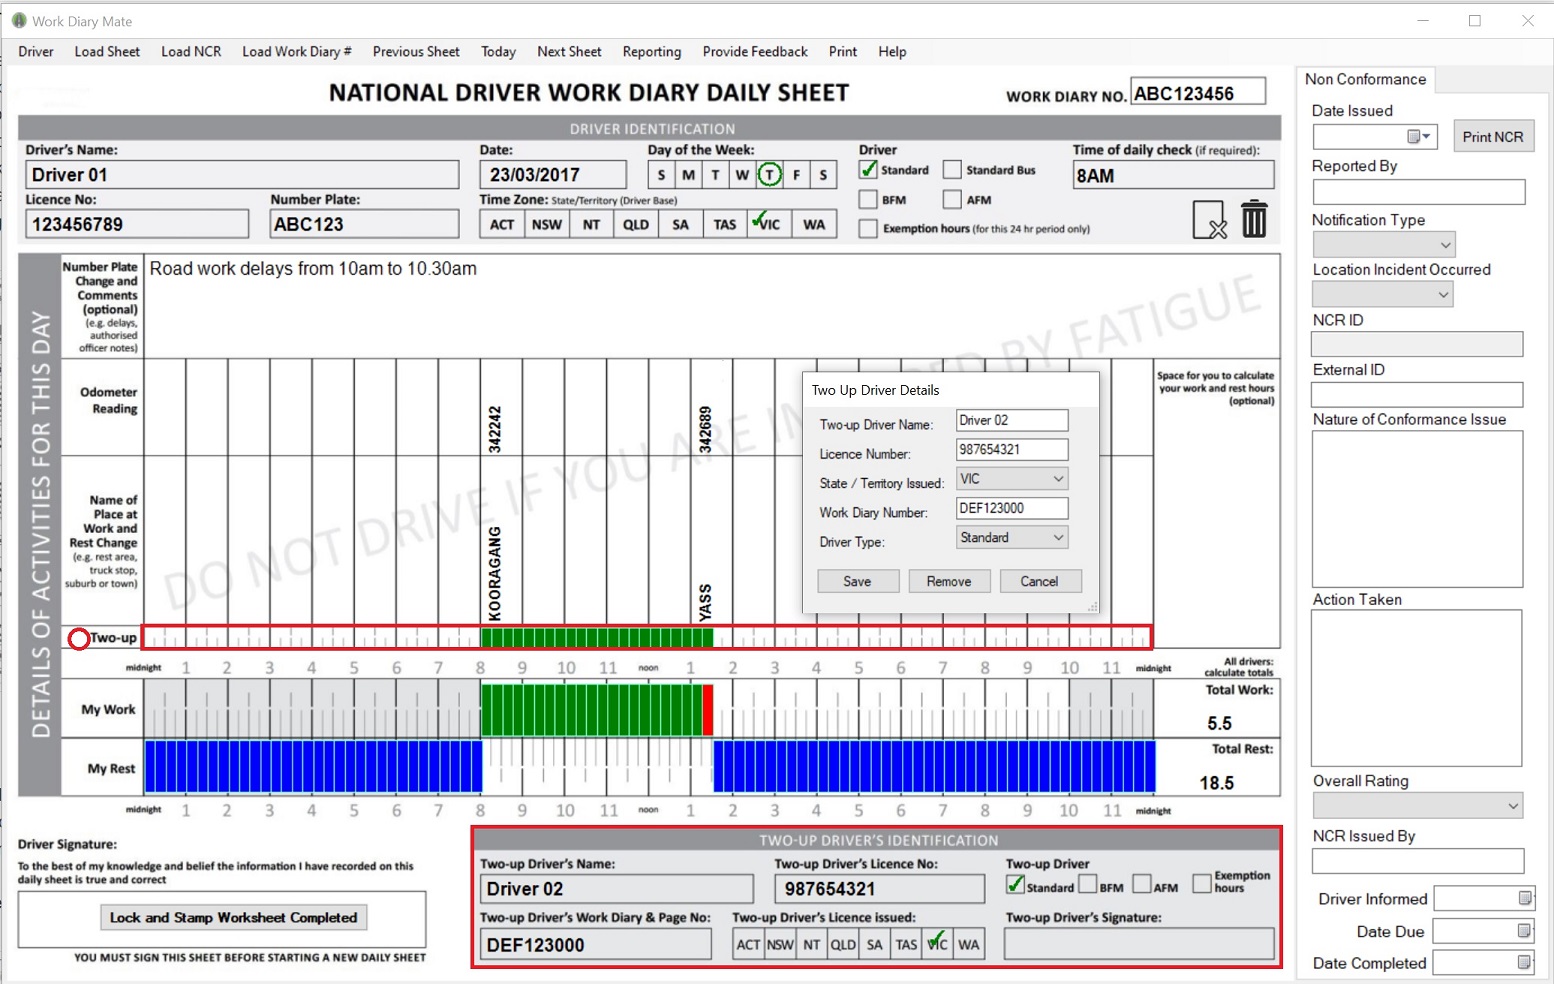
The areas on the daily sheet which relate to Two Up driving are outlined in red in the image below. Click in the Two Up Driver’s Identification area to enter in the details of the Two Up driver. To indicate that the driver is in a Two-up arrangement, click and drag in the Two Up section for the time period that the driver is in this arrangement. If you wish to mark the entire daily sheet as Two Up, click in the area to the left of the words “Two Up” (identified by the red circle in the image below). You can also remove Two Up by clicking in this same area.
Cancelling a Daily Sheet
If your driver has cancelled a daily sheet, you can record this against their driver record. Click on the Driver menu item and select the driver. Click on the Managed Cancelled Pages button and enter in the full Work Diary Number of the cancelled sheet and a comment as to why the sheet was cancelled by the driver.

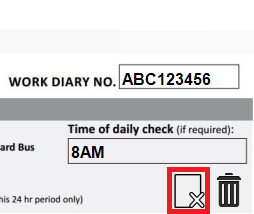
To quickly access the Manage Cancelled Pages area, simply click on this icon on the daily sheet.
Managing Work Diaries
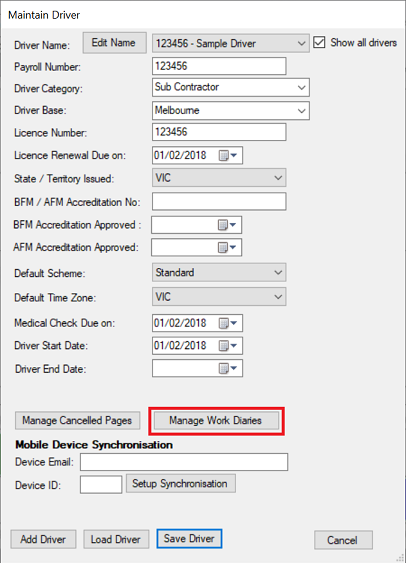
This feature allows you to record when your drivers obtain new work diaries. You can record the number of the first and last page of each work diary against their driver record. You can include the date the diary was started and the date when the diary was finished. This will allow you to keep track of which drivers are losing books by running the Driver Work Diary Report. This information also feeds into the Missing Pages/Work Diary No. Exception Report which identifies missing work diary pages for you.

Settings
The Settings option is located in the Help menu item.

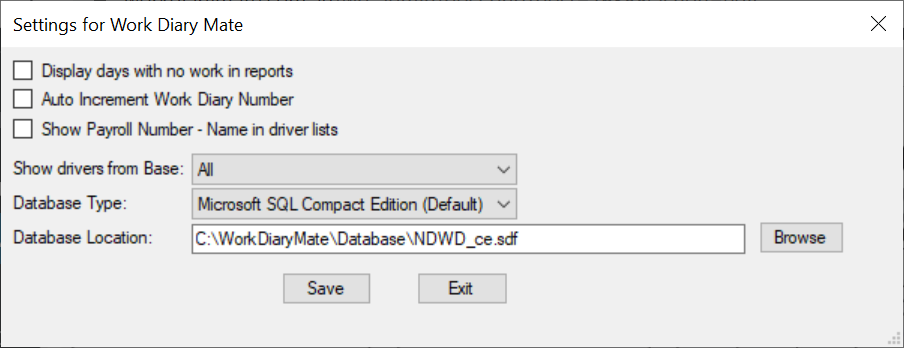
Display days with no work in reports
You can choose to display days where no work is recorded on a daily sheet in the Summary Report and Detailed Driver Report, if this option is selected.
Auto Increment Work Diary Number
This feature when selected automatically assigns the next Work Diary Number for you. A Work Diary Number will only be assigned after work is entered on that daily sheet. If you don’t select this option, the Work Diary Number field is left blank on each daily sheet for you to enter manually. This gives you the flexibility to indicate when a driver has not worked on a particular day by choosing to leave the Work Diary Number field blank.
Show Payroll Number
This option when selected will display the driver’s payroll number beside the driver’s name in driver drop down lists. The payroll number needs to be entered in the individual Driver record first.
Show drivers from Base
This option can be used to differentiate drivers from different locations and is helpful to reduce the length of your driver drop down list. You can set up different locations using the Driver base option in the Maintain Driver area.
Database Type
This displays the type of database the software is using. The default database type is Microsoft SQL Compact Edition. If you wish to run the software on multiple computers, we recommend switching across to Microsoft SQL Server or Cloud Storage to ensure best performance. Contact us for further information on how to migrate your database across.
Database Location
This lists the location of your database. You should regularly back up this data file as you would any data on your computer.
If you wish to run the software on mulitple computers we strongly recommend switching across to Microsoft SQL Server or Cloud Storage to ensure best performance. Contact us for further information on how to migrate your database across.
Sending your Work Diary to Support
If you are unsure of why a breach has occurred for a driver, this feature allows you to send your Work Diary to us so we can investigate further and offer you a detailed explanation. You can locate this option via the Help menu item.
Running Work Diary Mate on Multiple Computers
It is possible to run Work Diary Mate on mulitple computers. However, we strongly recommend switching your database across to Microsoft SQL Server or Cloud Storage to ensure best performance. Contact us for further information on how to migrate your database across.
If this is not possible, the alternative is to copy the default Microsoft SQL Compact Edition database file from your computer onto a network drive. The file to copy to your network drive is c:\WorkDiaryMate\Database\NDWD_ce.sdf
On the computer you have already installed Work Diary Mate for the Back Office on, you should start the software and select Help>Settings. There is a field called Database Location at the bottom with a Browse button next to it. Click the Browse button and select the file you have just copied to the network folder (NDWD_ce.sdf ). This means that Work Diary Mate will now use this file to store your driver data.
You can install Work Diary Mate on as many computers as you like in the office. You can download the Windows Software installer from this page.
When installing the software on another computer, the first time you start the software you will be asked for the location of the database. Point to the database file you have placed on your network drive and all versions of Work Diary Mate will be pointing to this single data file.
You should also regularly back up this data file as you would any data on your network.
